


PermalinkAWS Cloud
As organizations scale their cloud infrastructure on Amazon Web Services (AWS), the cost of running instances can become a significant concern. Many workloads do not require 24/7 availability, leading to unnecessary expenses. Fortunately, AWS offers a simple and effective solution to address this issue, using AWS Lambda to automate the start and stop processes of EC2 instances at regular intervals.
In this blog post, we will explore the benefits of automating EC2 instances and demonstrate how to implement this cost optimization strategy using AWS Lambda.
PermalinkBenefits of Automating EC2 Instances
Cost Savings: By stopping non-critical EC2 instances when they are not in use, organizations can significantly reduce their cloud infrastructure costs. AWS charges on a pay-as-you-go model, which means that instances running 24/7 can lead to higher bills. Automating the start and stop process allows you to pay only for the compute resources you genuinely need.
Environment Friendly: Implementing EC2 instance automation promotes sustainable practices by reducing the overall carbon footprint. Unnecessary instances that consume energy can be turned off, resulting in a greener and more eco-friendly cloud infrastructure.
Enhanced Security: Stopping instances when they are not needed can minimize the attack surface and potential security risks. It is a proactive approach to limit exposure to the public internet during periods of inactivity.
Simplified Management: Automating the start and stop of EC2 instances frees up valuable time for your IT team. Manual intervention to manage instance uptime can be a time-consuming task, and automation reduces the burden of administrative work.
Note: The following resolution is a simple solution. For a more robust solution, use the AWS Instance Scheduler. For more information, see Automate starting and stopping AWS instances.
Let's Begin ✌️
Step 1: Create a custom AWS IAM policy
Step 2: Create an IAM role for Lambda
Step 3: Create Lambda functions that stop and start your EC2
Step 4: Test your Lambda functions
Step 5: Create EventBridge rules that trigger your function on a schedule
Note: You can also create rules that trigger on an event that takes place in your AWS account.
PermalinkStep 1: Create an IAM policy and execution role for your Lambda function:
1. Login into the AWS Console. And go to IAM Config
2. Create an IAM policy using the JSON policy editor. Copy and paste the following JSON policy document into the policy editor:
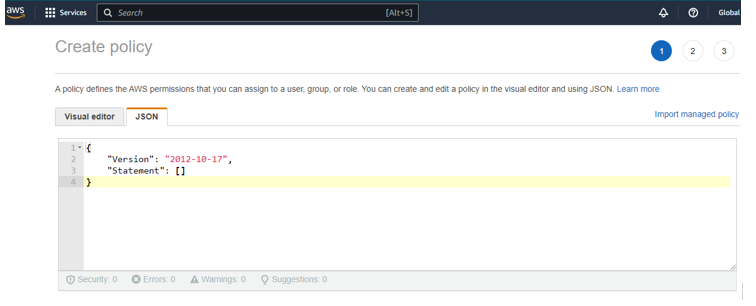
{
"Version": "2012–10–17",
"Statement": [
{
"Effect": "Allow",
"Action": [
"logs:CreateLogGroup",
"logs:CreateLogStream",
"logs:PutLogEvents"
],
"Resource": "arn:aws:logs:*:*:*"
},
{
"Effect": "Allow",
"Action": [
"ec2:Start*",
"ec2:Stop*"
],
"Resource": "*"
}
]
}
PermalinkStep 2:Create an IAM role for Lambda:

1. In the navigation pane of the IAM console, choose Roles, and then choose Create role.
2. For Select trusted entity, choose AWS service.
Important: When attaching a permissions policy to Lambda, make sure that you choose the IAM policy that you just created.
3. Now Select Policy Previously we created

PermalinkStep 3: Create Lambda functions that stop and start your EC2 instances:
1. In the Lambda console, choose Create function.
2. Choose Author from scratch.
3. Under Basic information,
Add the following:
For Function name, enter a name that identifies it as the function used to stop your EC2 instances. For example, “StopEC2Instances”.
For Runtime, choose Python 3.9.
Under Permissions, expand Change default execution role.
Under Execution role, choose Use an existing role.
Under Existing role, choose the IAM role that you created.
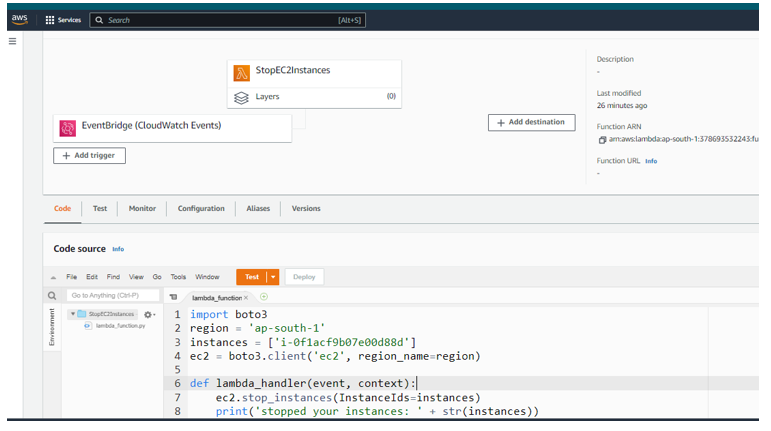
4. Choose Create function.
5. Under Code, Code source, copy and paste the following code into the editor pane in the code editor (lambda_function). This code stops the EC2 instances that you identify.
6.Check you Instance IDs and Region and change to the below config
import boto3
region = 'ap-south-1'
instances = ['i-12345cb6de4f78g9h', 'i-08ce9b2d7eccf6d26']
ec2 = boto3.client('ec2', region_name=region)
def lambda_handler(event, context):
ec2.stop_instances(InstanceIds=instances)
print('stopped your instances: ' + str(instances))
( Code as case sensitive and it will prompt error for Extra space )
Important: For region*, replace “ap-south-1” with the AWS Region that your instances are in. For instances, replace the example EC2 instance IDs with the IDs of the specific instances that you want to stop and start.*
6. Choose Deploy.
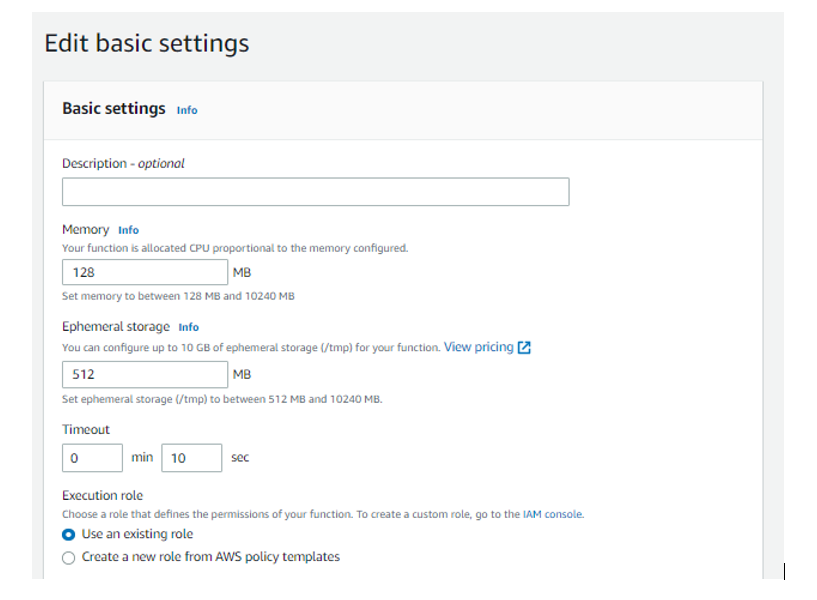
7. On the Configuration tab, choose General configuration, Edit. Set Timeout to 10 seconds and then select Save.
Note: Configure the Lambda function settings as needed for your use case. For example, if you want to stop and start multiple instances, you might need a different value for Timeout and Memory.
8. Repeat steps 1–7 to create another function. Do the following differently so that this function starts your EC2 instances:
In step 3, enter a different Function name than the one you used before. For example, “StartEC2Instances”.
In step 5, copy and paste the following code into the editor pane in the code editor (lambda_function):
Example function code — starting EC2 instances
import boto3
region = 'ap-south-1'
instances = ['i-12345cb6de4f78g9h', 'i-08ce9b2d7eccf6d26']
ec2 = boto3.client('ec2', region_name=region)
def lambda_handler(event, context):
ec2.start_instances(InstanceIds=instances)
print('started your instances: ' + str(instances))
( Code as case sensitive and it will prompt error for Extra space )
Important: For region and instances , use the same values that you used for the code to stop your EC2 instances.
PermalinkStep 4: Test your Lambda functions:
1. In the Lambda console, choose Functions.
2. Choose one of the functions that you created.
3. Select the Code tab.
4. In the Code source section, select Test.
5. In the Configure test event dialog box, choose Create new test event.
6. Enter an Event name. Then, choose Create.
Note: You don’t need to change the JSON code for the test event — the function doesn’t use it.
7. Choose Test to run the function.
8. Repeat steps 1–6 for the other function that you created (Start Instances).
Tip: You can check the status of your EC2 instances before and after testing to confirm that your functions work as expected.
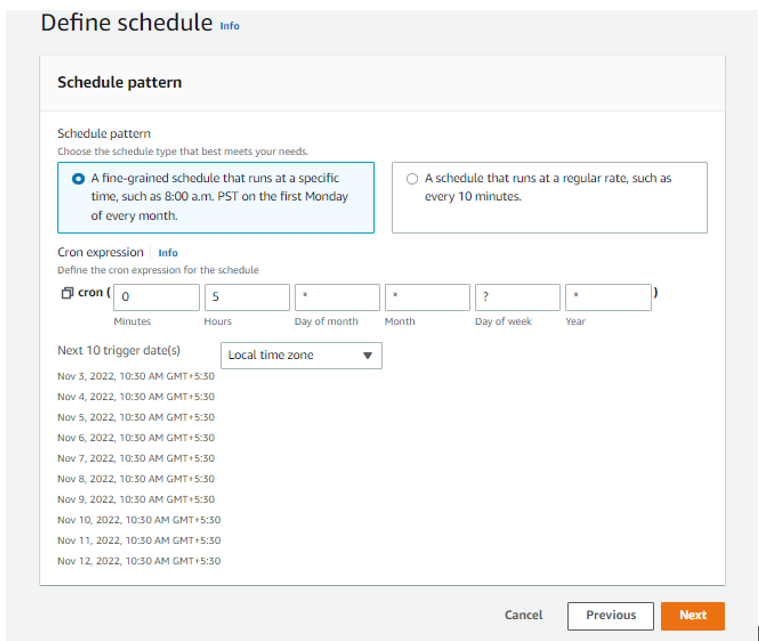
PermalinkStep 5: Create EventBridge rules that trigger your Lambda functions:
1. Open the Eventbridge console.
2. Select Create rule.
3. Enter a Name for your rule, such as “StopEC2Instances”. You can optionally enter a Description.
4. In Define pattern, select Schedule.
5. Do either of the following:
For Fixed rate of, enter an interval of time in minutes, hours, or days.
For Cron expression, enter an expression that tells Lambda when to stop your instances. For information on expression syntax, see Schedule expressions for rules.
**Note: Cron expressions are evaluated in UTC. Make sure that you adjust the expression for your preferred time zone.
6. In Select targets, choose Lambda function from the Target drop-down menu.
7. For Function, choose the function that stops your EC2 instances.
8. Scroll down and then select Create.
9. Repeat steps 1–8 to create a rule to start your EC2 instances. Do the following differently:
Enter a name for your rule, such as “StartEC2Instances”.
(Optional) Enter a Description, such as “Starts EC2 instances every morning at 7 AM.”
In step 5, for Cron expression, enter an expression that tells Lambda when to start your instances.
In step 7, for Function, choose the function that starts your EC2 instances.
Follow for More 👉

Medium — https://medium.com/@karthidkk123
Linked In — https://www.linkedin.com/in/karthick-dkk/
Instagram — https://www.instagram.com/karthick_dkk_dk/
Subscribe to our newsletter
Read articles from Karthick Dk's blog directly inside your inbox. Subscribe to the newsletter, and don't miss out.